Thursday

Canned Pumpkin Bread Recipe

For my friends over at Plurk...
(drumroll please!)
It's the Canned Pumpkin Bread post!!!
There are lots of pictures so I'll try to keep the jabber to a minimum. 

Here are the Ingredients you need. 
They Include...
2/3C shortening, 
2 2/3C sugar,
4 eggs,
2C pumpkin (I used canned, shame on me)
2/3C water
3 1/3C flour
1/2 tsp baking p0wder
2 tsp baking soda
1 1/2 tsp salt
1 tsp cinnamon
1 tsp ground cloves
2/3C nuts (optional, and I didn't because I'm allergic)

Now for the mechanics!
I want to introduce to you 
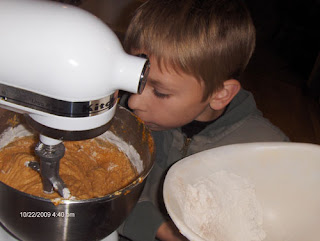
a friend of mine, and the guest chef for today!
His name is Tyler, and he did a bang up job! 
Step 1:
Sift the flour, baking powder, baking soda, salt, and spices.

Step 2:
Cream the shortening and sugars, then beat in the eggs, 
pumpkin, and water. 


Step 3:
Add the flour mixture to the pumpkin mixture.
Stir in nuts after this step if you choose.

Step 5:
Grease 7 wide mouth pint canning jars. (we used shortening)
Fill each jar 1/2 full with batter. 
Make sure to wipe the mouth of each jar when you are done,
otherwise they will not seal.

Step 6:
Bake in the oven at 325 degrees for 50-60 minutes.
When a toothpick comes out clean you are good. 
During last 15 minutes of cooking put all your jar lids
and rings into a pot on the stove to boil. This will disinfect them.

Step 7:
When they are done baking take them one at a time out
of the oven and put a lid and ring on it. 
They should seal fairly soon.

If they don't seal for some reason, 
they can also be frozen. 

Monday

Shows and Snows!

Hey! Sept. 26th marked a very special day for me. 
I did my first jewelry show!

It was held in St. Croix, Wisconsin for their 
Autumn Festival. 
It went well, and I already have another show
planned for this coming saturday! 

Here is me at my stall

At the show, I also debuted 
my new bracelets.
I call them "Squiggly Bracelets"
What do you think?


Today marks our first "real" snow here in Wisconsin.
Here are a few pics I snapped. 


Good thing I dug the potatoes last night... !
Here is what the garden looks like now!

After the show this Saturday, I have no idea
what is coming next for me. 
I have been holding out on listing items
until after the show, so look for new things next week in 
both my Etsy and my Artfire

Are you following me on Plurk

Next post: making canned pumpkin bread! 


Friday

Just An Update

Let's see, where to begin. 
I finally got some much needed days off 
that quickly got eaten up by doctors' visits and sickness.
One of which was for the first migraine I've ever had. 
It was TERRIBLE!

I got a custom order for wedding jewelry this week.
I absolutely LOVE what I came up with for it,  
I may just keep it! 

I also have a craft date with one of my friends tomorrow...
I am so exited! 
I don't have many (non-online) friends that share my
jewelry interests, so when I get to have a day to go to the bead store
and just veg out with some beads... just marvelous! 

I bought a sit up bar-thingy at a garage sale today. 
I figured for one dollar I could at least sit in it and pretend to 
do sit ups while I watch TV... :) 

Got to spend some time with my little sister in law today.
It amazes me how smart she is. 
We made a necklace for her, and went garage saleing for hours. 

I think that's about all that's going on in my world at the moment. 
I'll update later with pics of my bone work, 
which I haven't gotten many days to work on
since it's been raining here a lot. 


Thursday

Kitchen Remodel


Hi Everyone! 
I thought I'd show off what we've been up to the last couple weeks.
We painted our kitchen and redid the cabinets!! 

This is what it looked like before:

Here is after we started the remodel:


And we're not quite done yet, the doors have to be put back on. 
But at least with these final pics you can see the new colors, and get an idea.
I will have to upload the "all done" pics when we finish 
(hopefully this weekend)


So you can't really get an idea of what the cabinets look like, sorry. 
But I promise more pictures are coming. 

Another thing I'm working on is carving bone. 
I will be making beads and maybe some small statues. 
I'm still practicing, so I don't have any pictures for you yet. 

P.S. The bones being used are from animals that died of natural causes 
or road accidents. Every precaution was made to keep the process of 
cleaning as natural as possible, including leaving the bones in the wild until the meat 
and usable parts by animals were gone. 

Wednesday

Reasons to Have a Light on your Vaccum

1) In case a deer runs in front of you while you are vacuuming.

2) In case the guy robbing your house forgot a flashlight.

3) So you can vacuum your kids' bedrooms while they are sleeping and not have to turn on the light. 

4) Because it's really dark on the floor... 

5) Just in case you are afraid of the sun (and lamps).

6) To create the proper ambiance during household chores. 

7) So dogs and husbands can see the vacuum coming toward them and move.

8) Just in case you decide to rig the vacuum for road travel... 

9) So your children can pretend it's a UFO. 

10) To give me something to think about while cleaning the floors. 

Enjoy! 

Saturday

The News

I wanted to write about a new recipe I like, 
but that will have to wait. 
Instead I am going to have to apologize for both
the lack of activity in my shop
and the lack of activity in my blog. 

This week my grandfather passed away of lung and
throat cancer, and the next morning I got word
that a friend of mine and my husband's
 Also, my mother's best friend got in a car accident
this week, and is in the hospital with
non-life threatening injuries, 
but is at risk to lose a foot if she gets infection. 

Needless to say, I am a little stressed and
over stretched right now. 
I am still working on new pieces, 
some amethyst chip pieces are what I am working on right now. 
But I will probably not be uploading 
this week.

I will still be reachable by email 
cwinspirations.hotmail.com
and plurk
as well as checking my shop daily and 
answering any conversations.

Oh heart, if one should say to you that the soul perishes like the body, 
answer that the flower withers, but the seed remains - Kahlil Gibran. 

Quote from here


Friday

Home Made Chicken Noodle Soup


Today's post is all about doing things handmade... 
Noodles! 
That's right, I'm going to share with you my grandma's recipe
for her home made chicken noodle soup! 
I even have pictures.
(How prepared am I!) 

Ingredients:
1 chicken, sectioned or not
4 to 6 carrots
3 to 5 stalks of celery 
Soup Base (I used Orrington Farms)
parsley, rosemary, bay leaves, salt & pepper

Noodles:
4 eggs 
(I use organic from my mother in law when I can)
3Cups flour
2tbsp water
1tbsp oil
salt
flour to roll out

First, boil the chicken. This should take anywhere from around a half hour up, 
depending on what kind of chicken you get and how big the pieces are. 
Make sure it's cooked properly! 
I start the chicken then move on to the noodles. 
First boil some water for the noodles before you start them. 

Mix all the ingredients for noodles with a mixer. 
It can be done by hand, but it's a pain!
I used to do it by hand in my apartment before I got married... ugh.

Sometimes I let the dog help? Hahaha. I spilled some flour.

Oh Gus, You're too cute!

Once the noodle dough is mostly done, knead the dough
to incorporate all the ingredients fully. Also, it makes the dough 
a little smoother and easier to work with. 
The dough should not be sticky, and if it is just wipe a little 
extra on your work surface so it doesn't stick. 
Then roll the dough out as thin as you would like the noodles to be. 

Here is the dough rolled out and partly cut. 
Cut the dough into strips! I like my noodles a little thicker, and my husband likes
them thinner. 
This is about how thick I cut them:

Now put the noodles in the boiling water, about three handfuls at a time. 
Do not overfill the pot, as it is easy for all the 
starches to foam up, and you don't want
your noodles to stick together. 
Stir the noodles a few times during cooking, which should take about three minutes. 
The noodles will float when they are done, 
and you can always taste them to make sure.
Also, if you take them out a little too soon
 they will always cook a little more in
the soup. 


Here are the finished noodles! Now, set them aside to work on the rest of the soup. The chicken should be done by now, and you may have taken it out to cool already. I strain the water from the chicken to use as the base for the soup, then add soup base to it. I do not measure, just look for the right color and taste. (should be several table spoons full)
strip all the chicken from the bones, and add it back to the pot. Then cut up the carrots and celery, however thick you want them, and add those too.
Then add the herbs and noodles. I like the spices I listed in the recipe, but use whatever you like. If there is too much ingredients and not enough broth, mix the soup base and the water together before adding it to the pot, so you don't have to re-season the whole pot of soup. 

You are done! It's ready to eat (as long as the veggies are cooked), but I like to let it sit on 
low for an hour or more to let all the flavors mix. And it's almost better the next day! 


Thursday

Eden's Wake

Who loves purses?
Well, me! But I know I'm not the only one.
And what makes a good purse? 
(Or should I say who?)

The answer is Eden's Wake, on Etsy!
This mother daughter team opened up shop just two short months ago, 
and already the quality of their work and their breathtaking fabrics are
 turning heads! 
(They certainly did mine!) 

Check out this gorgeous handbag!
The perfect thing for spring
with all this color and a great vibrant pattern.


They also do applique. 
This tote can go from lunch with the girls
 to a day at the beach, 
and carry your items with ease!

Eden's Wake has purses for every buyer, 
from a $98 dollar bag to a $6 dollar bag.
You can't go wrong! 


Only $23 for this adorable elephant applique. 
It could be used from day to day, 
for a kids tote (handy for church and car rides!)
as a book bag for the library...
the list is really endless. 

For readers on a budget
(who isn't on a budget these days)
that still wants one of these great bags
how about this great red pleated bag.
At only $15, it's like a great sale, 
without the sale!


I suggest pouncing on this, as it won't last long!

So why don't you head over to Eden's Wake
check out all the amazing purses, bags, totes, coin purses, 
and all the goodies they have to offer over there. 
I promise you will find something to put on your wish list
(or maybe just purchase now!)
Happy Spring/Mother's Day/etc. etc.
Every day is an excuse for a new purse!
They also do custom orders. (wink wink!)

Follow me on Twitter for sales
that I only give to my twitterers!
Check out my shop for all my new items 
and for a heads up on when I will be uploading new items! 


Sunday

The Crazy Antelope Post!


Hello again bloggedy blog world, and Happy Easter!
 What am I up to? Well I'm driving home from Wyoming, where I spent Easter weekend with my great aunts and uncles, 
and also hit up a bead shop in Casper, WY. 

I also tied up the loose ends on a custom order. This is a picture of the finished product. 

I love Wyoming! I like to see my relatives
But mostly...
(I just love seeing antelope!)

This is the view from my uncle's back porch.


This is the first time we have left our babies (read: Dogs) 
This is Gus, our 7 month old pug.
He goes to get coffee with my every Tuesday! 
(but he gets water and treats, instead of coffee)

And this handsome boy is Rocky. 
We rescued him from our local shelter last July, so we don't know how old he is. 
We do know that since we got him... there is a curious lack of flies in our home! 
He is half Jack Russell Terrier, and half Springer Spaniel.
Those flies don't stand a chance! 


So now that I've written a long, rambling post that was only vaguely related to crafting in any stretch of the word, I'm going to get back to my drive and search the treasuries for my next feature! 

I offer sales through twitter I don't give anywhere else for my

Tuesday

Ever Improving Me

Hello! The first post to my new blog... exiting! 
I decided to do a feature to break things in a bit. 

EverImprovingMe


An artist of many talents, when you click into her shop  
you can see anything from dream
 catchers to reusable sandwich bags, pictured above. The sandwich bags, available in many different patterns ( custom orders available!!!) are dishwasher safe, or just clean them with soap and water. She also has the cleaning instructions in all of her listings. These bags make 
me feel like going back to school, just to pack my lunch with her bags!
 But of course, they are much more diverse than just for a school lunch. My husband could use them to pack lunch for work, and they are perfect 
for picnics, and anywhere that you may be needing a sandwich.
I would also like to point out that they are economical, as they are reusable. No more brown bags, just beautiful patterns that make being eco-friendly fun! 


Some of the other items in EverImprovingMe's shop that I love!

EverImprovingMe also has Twitter and a blog, which makes her really easy to interact with, and get a hold of. (to ask her to make some custom sandwich bags, of course!) She also has a monthly giveaway on her blog that you might want to check out! 


Well, that's EverImprovingMe in a nutshell. Make sure you check out her blog to see what her giveaway is this month, and definitely check out her shop!

I guess this is the end of my first post as a blogger! Stay tuned to see who the next feature is, and I will start giveaways at some point... ! Check out my shop also, and make sure to follow me on  Twitter for sales that are offered only to my followers! 
Till next time!